
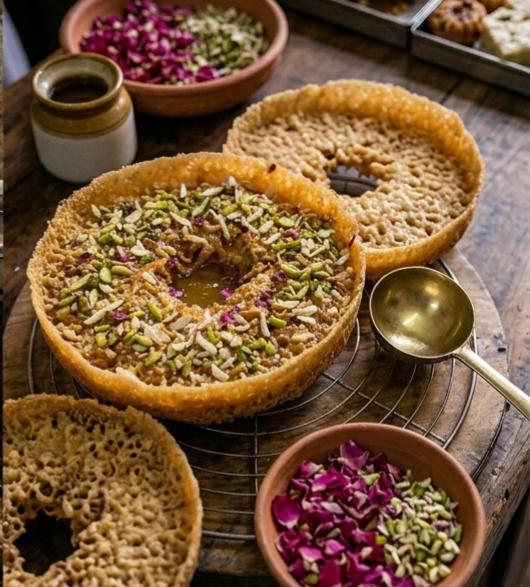
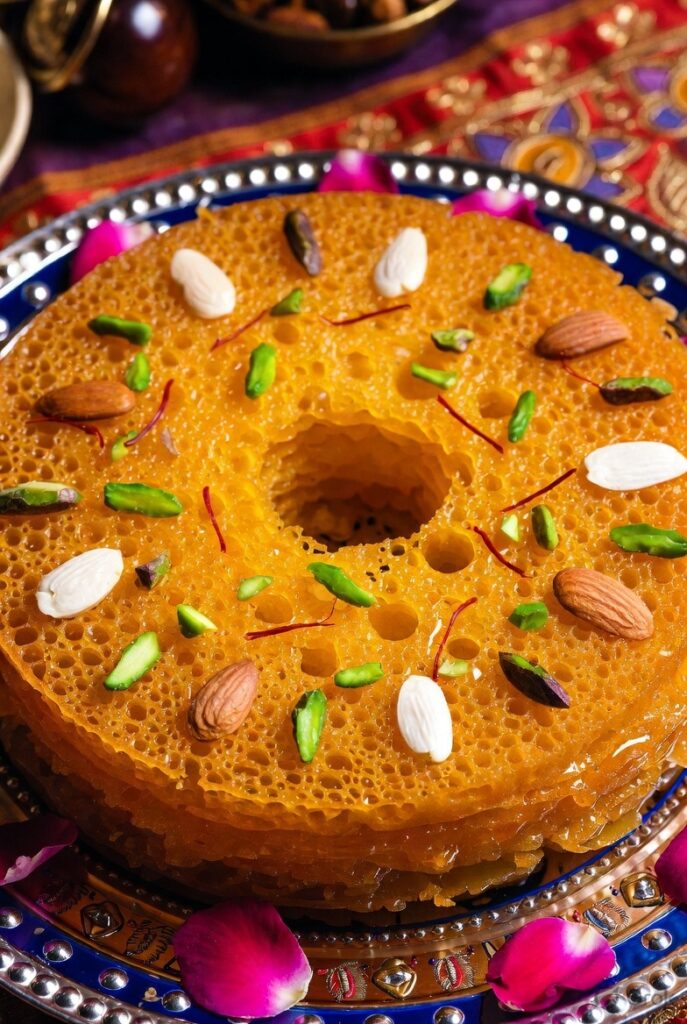
If you want to make the ultimate Crispy Rajasthani Sweet in 4 Simple Steps right in your own kitchen, nothing beats the grand tradition of a perfectly made Ghevar. Known across India as a legendary delicacy, this honeycomb-textured disc soaked in aromatic sugar syrup and topped with rich mawa (khoya) is a festive showstopper. Traditionally prepared during vibrant festivals like Teej and Raksha Bandhan, its irresistible crunch and rich flavors make it a favorite year-round dessert.
While it looks incredibly intricate and intimidating to prepare, making this delightful sweet at home is surprisingly easy. You don’t need to be a master halwai to get those signature porous webs. Let’s break down how to get the best results with this simple method that anyone can follow!
Ingredients You’ll Need:Crispy Rajasthani Sweet in 4 Simple Steps
Before we dive into the cooking process, gather these basic kitchen essentials:
| Component | Ingredients |
|---|---|
| The Batter | 4 tbsp Ghee (solidified), 4-5 Ice cubes, 1 cup All-purpose flour (maida), 41 cup Chilled milk, 3 cups Chilled water, 1 tsp Lemon juice |
| The Sugar Syrup | 1 cup Sugar, 21 cup Water, a few strands of Saffron (kesar), 41 tsp Cardamom powder |
| The Royal Topping | 150g Fresh mawa (khoya), 2 tbsp powdered sugar, Chopped almonds, pistachios, and edible silver foil (chandi vark) |
| Frying | Ghee or vegetable oil for deep frying |
Export to Sheets
Crispy Rajasthani Sweet in 4 Simple Steps
How to Make a Crispy Rajasthani Sweet in 4 Simple Steps
Step 1: Prepare the Halwai-Style Chilled Batter
The absolute secret to mastering this Crispy Rajasthani Sweet in 4 Simple Steps lies entirely in temperature contrast. You need a freezing cold batter hitting blazing hot oil to form those beautiful webs.
- Cream the Ghee: In a large mixing bowl, add 4 tablespoons of solidified ghee and 4-5 ice cubes. Rub the ghee and ice together vigorously using your hands or a whisk. Within 3-4 minutes, the ghee will transform into a brilliant white, creamy, and smooth butter-like paste. Discard the leftover ice cubes.
- Add the Flour: Add 1 cup of all-purpose flour (maida) in small batches, alternating with 41 cup of chilled milk. Mix gently with your fingertips until it resembles coarse breadcrumbs.
- Thin it Out: Slowly pour in the ice-cold water while whisking continuously to ensure no lumps form. Whisk until you get a completely smooth, thin, running consistency (similar to buttermilk).
- The Secret Touch: Stir in 1 teaspoon of lemon juice. This helps the starch in the flour create a strong, crisp mesh framework. Keep this batter sitting inside a larger bowl filled with ice water so it stays freezing cold.
Step 2: Fry to Crispy, Porous Perfection
- Heat the Fat: Take a deep, narrow, heavy-bottomed saucepan (about 6-7 inches wide) and fill it halfway with ghee or oil. Heat it over a high flame until the oil is smoking hot.
- The Pouring Technique: Take a small ladleful of the ice-cold batter. Stand back slightly and pour it right into the dead center of the boiling hot oil from a height of about 7-8 inches. The batter will instantly react, sizzle violently, and foam up to the top.
- Create the Center Hole: Wait 10-15 seconds for the foam to settle down slightly. Take a wooden skewer or the back of a wooden spoon and gently push the batter to the sides, creating a small hole right in the center.
- Build the Layers: Pour another small ladle of batter directly into that center hole. Let it foam up and settle, then push it aside again. Repeat this pouring process 4 to 5 times to build a thick, sturdy, honeycomb-textured disc.
- Release and Drain: Once the final layer settles, lower the heat slightly to medium. Use your skewer to press the top edge of the Ghevar down into the hot oil for a few seconds so it browns evenly. Once it turns a beautiful golden-brown color, gently slide your skewer through the center hole, lift the disc out, and let it drain completely over a wire rack.
Step 3: Soak in Aromatic Sugar Syrup
- Boil the Syrup: In a separate pan, combine 1 cup of sugar with 21 cup of water. Bring it to a boil over medium heat. Add your saffron strands and cardamom powder for that unmistakable royal aroma.
- Check Consistency: Cook the syrup until it reaches a clear, sticky, one-string consistency. If you cool a drop between your thumb and index finger, a single thread should form when you pull them apart. Turn off the heat and let it cool slightly until it is warm.
- Sweeten the Disc: Place your fried, crispy Ghevar disc back on a wire mesh or cooling rack with a plate underneath to catch drips. Gently ladle the warm sugar syrup all over the top of the disc. The porous holes will absorb the sweetness beautifully while keeping the outer structure exceptionally crunchy.
Step 4: Garnish with Royal Mawa & Nuts
- Prep the Mawa: Crumble your fresh mawa into a pan, add 2 tablespoons of sugar, and cook it over a low flame for 2-3 minutes until it softens into a smooth, spreadable paste. Let it cool down to room temperature.
- Assemble: Gently spread a luscious, even layer of this cooked mawa over the top surface of your syrup-soaked Ghevar.
- Decorate: Generously shower the top with sliced almonds, vibrant green pistachios, and delicate pieces of edible silver foil (chandi vark). Your magnificent, authentic crispy Rajasthani sweet is officially complete and ready to amaze!
Pro Tips for Crispy Rajasthani Sweet in 4 Simple Steps Success
- Keep it Ice-Cold: If your kitchen gets warm while frying, always return the batter bowl back over an ice bath. If the batter warms up, you will lose the signature crispy web texture.
- The Right Height: Pouring the batter from a height of 7-8 inches is crucial. The impact of the batter hitting the hot oil from a distance forces it to split apart, creating those beautiful, delicate pores.
- Storage Secret: If you want to make this sweet in advance, store the fried, un-syruped crispy discs in an airtight container for up to two weeks. Simply warm up fresh syrup and apply the mawa topping right before you plan to serve it! Additionally, you can learn more about the heritage behind these unique textures by reading about the history of Rajasthani cuisine.
Crispy Rajasthani Sweet in 4 Simple Steps
One thought on “Crispy Rajasthani Sweet in 4 Simple Steps”